Playing with Node.js and Three.js: Enhancing Your 3D Web Project with Custom Models and Textures
Welcome back to my series on Node.js and Three.js! If you haven’t read the first part yet, I highly recommend starting there to get the foundational knowledge necessary for this post. You can find it here.
Inspiration
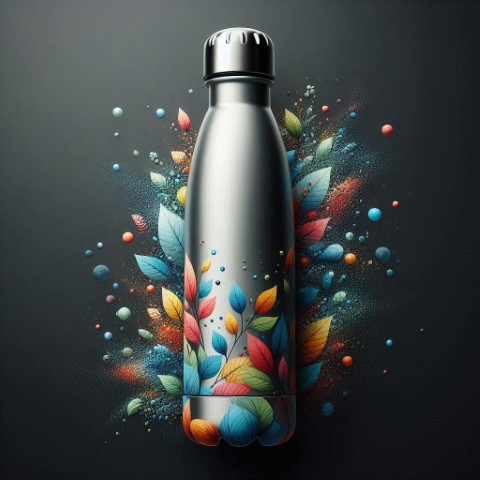
I’ll be creating a mock product showcase for a custom water bottle. To get started, I needed some inspiration, so I used Bing to generate a few images. I selected this particular image as a reference for my project. Spoiler alert: the final result will look quite different from the inspiration image!
Blender
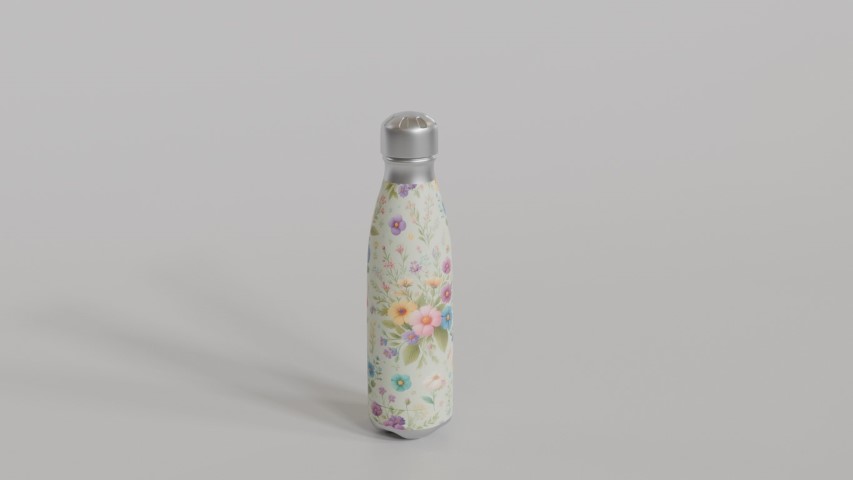
Using my Blender skills, I created a detailed model of a water bottle. Then, I generated some textures with AI and applied them to the model. Here is the rendered result.
Exporting the Model
Technically, I could export the model now, but it’s more optimal to adjust the mesh a bit. My bottle has a single mesh with two materials. While Blender can handle this, during export, it automatically separates the model into two meshes with one material each. To simplify things, I manually separated the bottle into two objects in Blender. This way, I can easily identify each object after export.
For the export format, I chose glTF, which has two variants: separate and binary. The separate variant creates .gltf and .bin files for the mesh and materials and saves each texture separately in common image formats. This is useful when materials are created in Blender and exported to Three.js. However, I wanted to create my own materials from scratch, so I opted for the binary format, which creates a single .glb file containing the entire model and materials.
In Blender’s export dialog, I carefully deselected everything unnecessary and chose not to export materials. This resulted in a bottle.glb file. Initially, the file size was 999KB due to the model’s complexity, but with compression, I reduced it to a manageable 101KB. However, importing this new resource requires some additional steps in Three.js to handle the compressed file.
Storing the Model
The compiled project needs to access and load the model, so I placed the uncompressed bottle.glb file in the newly created ./dist/assets/ folder. Later, I’ll add a few more files there later.
Loading the Uncompressed Model
Finally, let’s get into some code. I won’t dive deep into the details, as this is just the index.js file from the previous project with several improvements.
1
2
3
4
5
6
7
8
9
10
11
12
13
14
15
16
17
18
19
20
21
22
23
24
25
26
27
28
29
30
31
32
33
34
35
36
37
38
39
40
41
42
43
44
45
46
47
48
49
50
51
52
53
54
55
56
57
58
59

import * as THREE from 'three';
import { GLTFLoader } from 'three/examples/jsm/loaders/GLTFLoader.js';

// Create a scene
const scene = new THREE.Scene();

// Create a camera
const camera = new THREE.PerspectiveCamera(75, window.innerWidth / window.innerHeight, 0.1, 1000);
camera.position.y = 0.5;
camera.position.z = 1;

// Create a material that's visible without a light
const material = new THREE.MeshMatcapMaterial();

// Store the bottle
let bottle = null;

// Load the bottle model
const loader = new GLTFLoader();
loader.load('/assets/bottle.glb',
    (gltf) => {
        // Save the bottle model
        bottle = gltf.scene;

        // Add the bottle model to the scene
        scene.add(bottle);

        // Traverse the bottle model and set the material
        bottle.traverse((o) => {
            if (o.isMesh) {
                o.material = material;
            }
        });
    });

// Create a renderer
const renderer = new THREE.WebGLRenderer({ antialias: true });
renderer.setSize(window.innerWidth, window.innerHeight);

// Setup renderer magic
renderer.setPixelRatio(window.devicePixelRatio);
renderer.toneMapping = THREE.ACESFilmicToneMapping;
renderer.toneMappingExposure = 1;

// Add the renderer to the DOM
document.body.appendChild(renderer.domElement);

// Animation loop
renderer.setAnimationLoop((timestamp) => {
    // Render the scene
    renderer.render(scene, camera);
});

// Resize the canvas when the window is resized
window.addEventListener('resize', (event) => {
    renderer.setSize(window.innerWidth, window.innerHeight);
    camera.aspect = window.innerWidth / window.innerHeight;
    camera.updateProjectionMatrix();
});
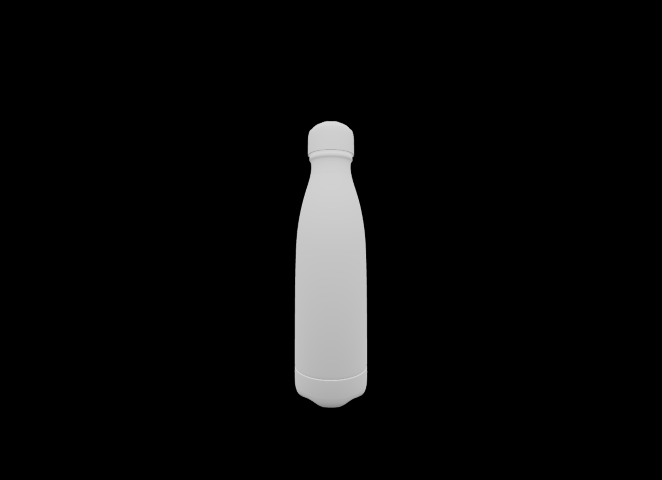
And this is how the web page looks now.
Loading the Compressed Model
Now, let’s swap the ./dist/assets/bottle.glb file with the compressed version. Trying to load the model now will cause an error visible in javascript console of the web browser:
1

Error: THREE.GLTFLoader: No DRACOLoader instance provided.
To resolve this, I need to perform a two-step process to integrate DRACOLoader into the project.
Step One: DRACOLoader requires some files to be accessible to its JavaScript. You can use the hosted files at https://www.gstatic.com/draco/v1/decoders/, but I chose to host them myself. I copied draco_decoder.wasm and draco_wasm_wrapper.js from the directory ./node_modules/three/examples/jsm/libs/draco/ to a newly created folder ./dist/decoders/.
Step Two: Next, we update our code to include DRACOLoader, and everything works again.
1
2
3
4
5
6
7
8
9
10
11
12
13
14
15
16
17
18
19
20
21
22
23
24
25
26
27

import { DRACOLoader } from 'three/examples/jsm/loaders/DRACOLoader.js';

(...)

// Load the bottle model
const draco = new DRACOLoader();
draco.setDecoderPath('/decoders/');

const loader = new GLTFLoader();
loader.setDRACOLoader(draco);
loader.load('/assets/bottle.glb',
    (gltf) => {
        // Save the bottle model
        bottle = gltf.scene;

        // Add the bottle model to the scene
        scene.add(bottle);

        // Traverse the bottle model and set the material
        bottle.traverse((o) => {
            if (o.isMesh) {
                o.material = material;
            }
        });
    });

(...)
Making the Bottle out of Metal
This is a simple step. By changing the material from MeshMatcapMaterial to MeshPhysicalMaterial, we gain access to many cool settings. One of these is metalness, which makes the bottle look like it’s made of metal. Adding a bit of roughness is also a good idea, as perfectly smooth metal doesn’t exist.
1
2
3
4
5

// Create a material that's invisible without a light
const material = new THREE.MeshPhysicalMaterial({
    metalness: 1,
    roughness: 0.3,
});
Oh no! The screen is black! Did something go wrong? Not at all! When rendering a scene, lighting is essential. The bottle is there, looking beautiful and metallic, but it’s so dark that we can’t see it. So, what’s the solution? Adding multiple THREE.PointLights? I’m not great at illuminating scenes, so I use a life-hack that makes objects look much better than what others can achieve. I will just use an HDR image to light the scene.
I chose this HDR image and downloaded it in 1K resolution:
Next, I used this website to convert the image from .hdr to .jpg:
And I received a very lightweight (<200KB) file looking like this: 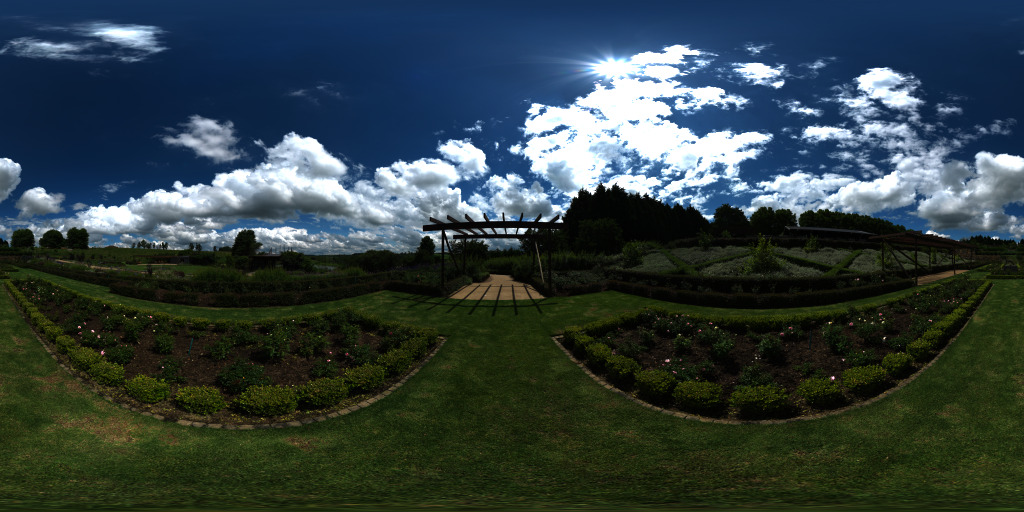
Then, I placed the newly created environment.jpg into the ./dist/assets/ folder.
This allows me to use TextureLoader to load it into my code. I specified that it’s an EquirectangularReflectionMapping, and then instructed the material to use the environment for illumination. The code to create the material looks like this:
1
2
3
4
5
6
7
8
9
10
11
12
13

// Load an environment texture
const environment = new THREE.TextureLoader().load(
    '/assets/environment.jpg',
    (texture) => {
        texture.mapping = THREE.EquirectangularReflectionMapping;
    });

// Create a metallic material
const material = new THREE.MeshPhysicalMaterial({
    metalness: 1,
    roughness: 0.3,
    envMap: environment,
});
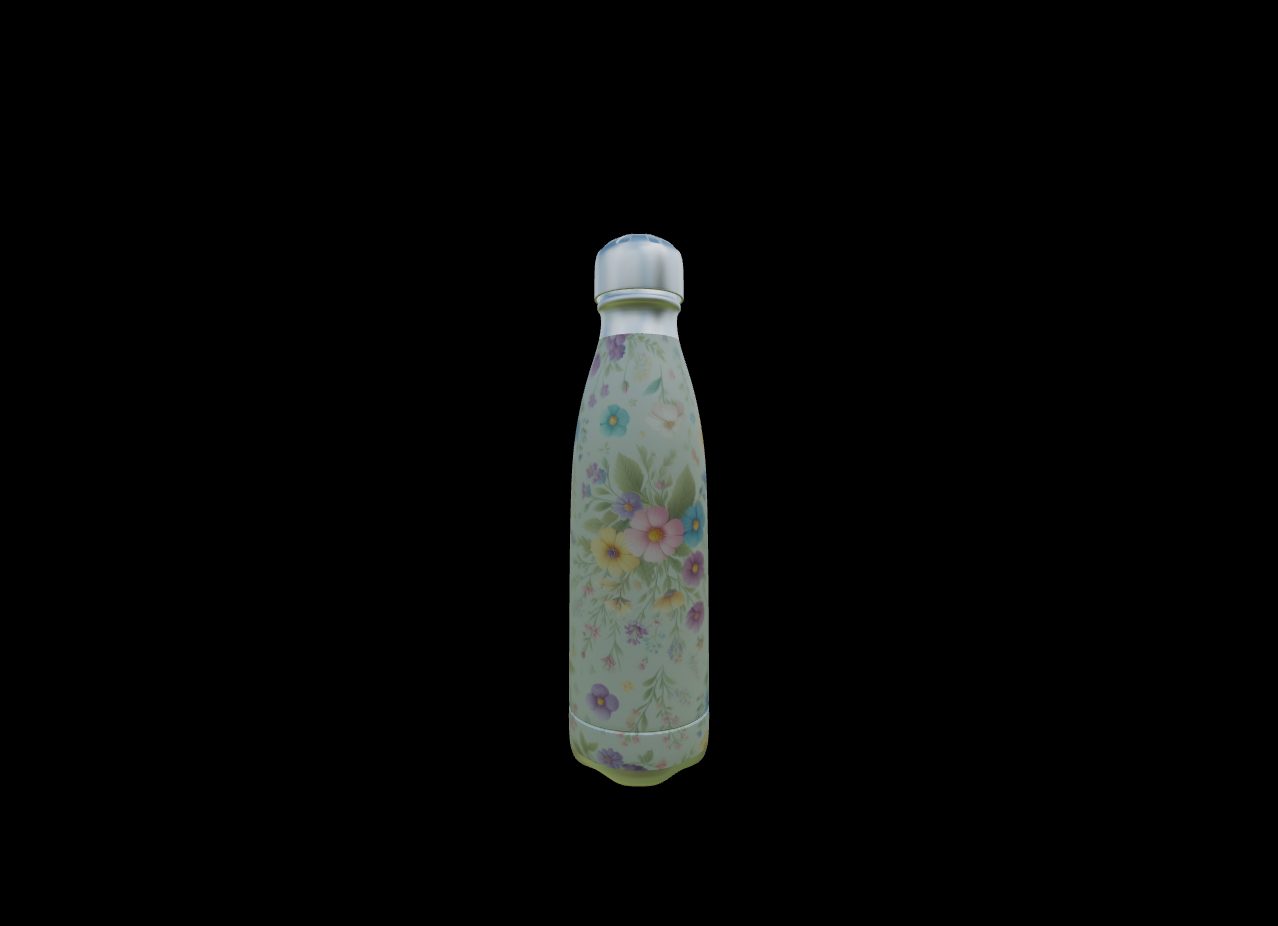
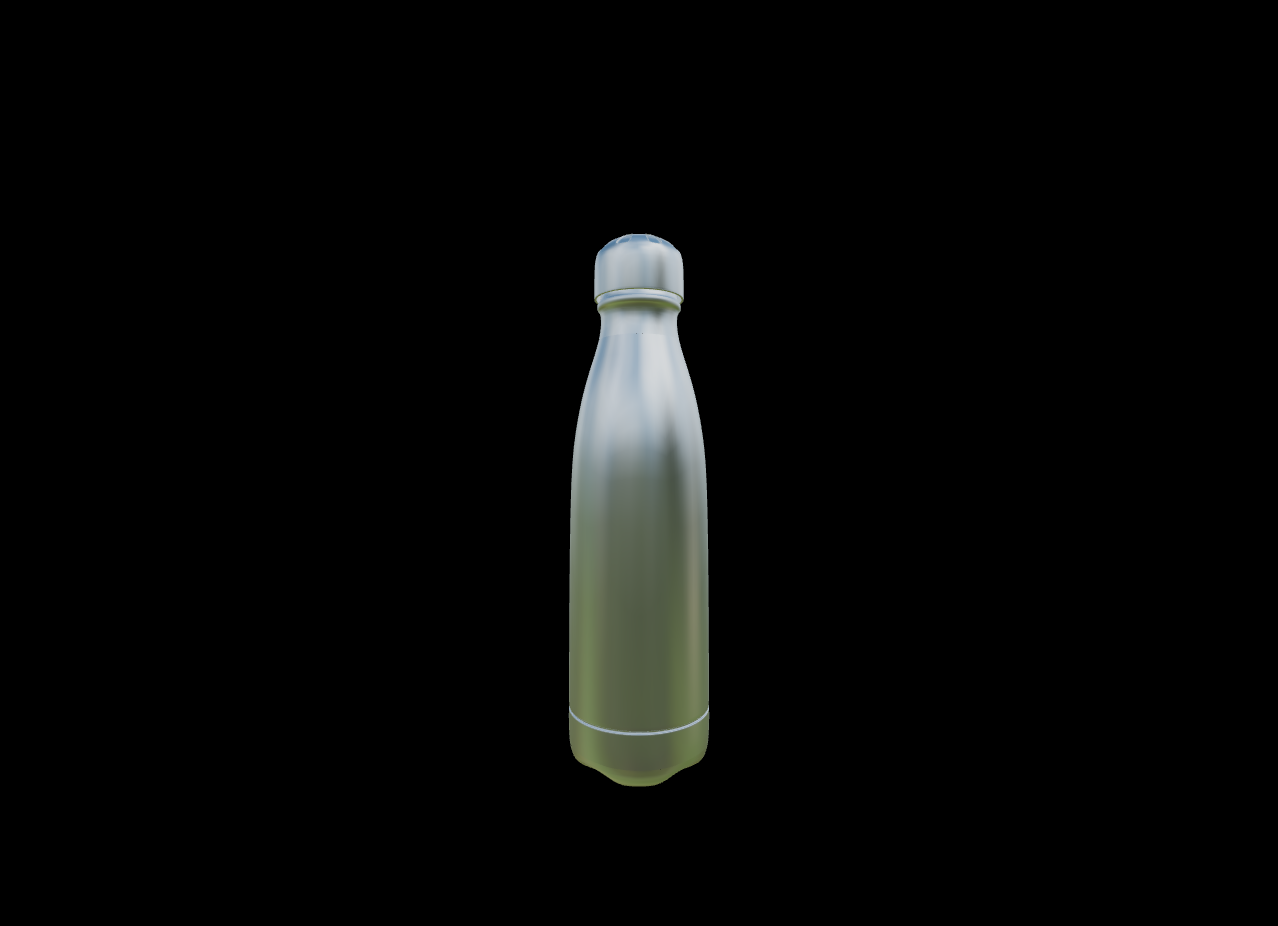
This is how our bottle looks with the lit metal material applied:
Adding the flowers
Now that we’ve applied the metal material, we can create a second material to add the beautiful pattern onto the bottle. I generated a flowery pattern, and put it together with other assets.
1
2
3
4
5
6
7
8
9

// Load a pattern texture
const texture = new THREE.TextureLoader().load('/assets/pattern.jpg');

// Create a material
const pattern = new THREE.MeshPhysicalMaterial({
    roughness: 0.4,
    map: texture,
    envMap: environment,
});
I need to update the code to assign materials by their specific names. This is straightforward since I labeled them clearly and distinctly in Blender.
1
2
3
4
5
6
7
8
9
10
11

// Traverse the model and set the material
bottle.traverse((o) => {
    if (o.isMesh) {
        if (o.name === 'Bottle') {
            o.material = material;
        }
        if (o.name === 'Sticker') {
            o.material = pattern;
        }
    }
});
Animation
Now the cool factor needs to be added. The bottle has to spin. But now the model is loaded asynchronously after the page was loaded so for few frames it remains null so I need to check for this case.
1
2
3
4
5
6
7
8
9
10

// Animation loop
renderer.setAnimationLoop((timestamp) => {
    // Rotate the model after it's loaded
    if (bottle) {
        bottle.rotation.y += 0.015;
    }

    // Render the scene
    renderer.render(scene, camera);
});
Final version
So in the end my code looks like this:
1
2
3
4
5
6
7
8
9
10
11
12
13
14
15
16
17
18
19
20
21
22
23
24
25
26
27
28
29
30
31
32
33
34
35
36
37
38
39
40
41
42
43
44
45
46
47
48
49
50
51
52
53
54
55
56
57
58
59
60
61
62
63
64
65
66
67
68
69
70
71
72
73
74
75
76
77
78
79
80
81
82
83
84
85
86
87
88
89
90
91
92
93
94
95

import * as THREE from 'three';
import { GLTFLoader } from 'three/examples/jsm/loaders/GLTFLoader.js';
import { DRACOLoader } from 'three/examples/jsm/loaders/DRACOLoader.js';

// Create a scene
const scene = new THREE.Scene();

// Create a camera
const camera = new THREE.PerspectiveCamera(75, window.innerWidth / window.innerHeight, 0.1, 1000);
camera.position.y = 0.5;
camera.position.z = 1;

// Load an environment texture
const environment = new THREE.TextureLoader().load(
    '/assets/environment.jpg',
    (texture) => {
        texture.mapping = THREE.EquirectangularReflectionMapping;
    });

// Create a metallic material
const material = new THREE.MeshPhysicalMaterial({
    metalness: 1,
    roughness: 0.3,
    envMap: environment,
});

// Load a pattern texture
const texture = new THREE.TextureLoader().load('/assets/pattern.jpg');

// Create a material
const pattern = new THREE.MeshPhysicalMaterial({
    roughness: 0.4,
    map: texture,
    envMap: environment,
});

// Store the bottle
let bottle = null;

// Load the bottle model
const draco = new DRACOLoader();
draco.setDecoderPath('/decoders/');

const loader = new GLTFLoader();
loader.setDRACOLoader(draco);
loader.load('/assets/bottle.glb',
    (gltf) => {
        // Save the bottle model
        bottle = gltf.scene;

        // Add the bottle model to the scene
        scene.add(bottle);

        // Traverse the model and set the material
        bottle.traverse((o) => {
            if (o.isMesh) {
                if (o.name === 'Bottle') {
                    o.material = material;
                }
                if (o.name === 'Sticker') {
                    o.material = pattern;
                }
            }
        });
    });

// Create a renderer
const renderer = new THREE.WebGLRenderer({ antialias: true });
renderer.setSize(window.innerWidth, window.innerHeight);

// Setup renderer magic
renderer.setPixelRatio(window.devicePixelRatio);
renderer.toneMapping = THREE.ACESFilmicToneMapping;
renderer.toneMappingExposure = 1;

// Add the renderer to the DOM
document.body.appendChild(renderer.domElement);

// Animation loop
renderer.setAnimationLoop((timestamp) => {
    // Rotate the model after it's loaded
    if (bottle) {
        bottle.rotation.y += 0.015;
    }

    // Render the scene
    renderer.render(scene, camera);
});

// Resize the canvas when the window is resized
window.addEventListener('resize', (event) => {
    renderer.setSize(window.innerWidth, window.innerHeight);
    camera.aspect = window.innerWidth / window.innerHeight;
    camera.updateProjectionMatrix();
});